
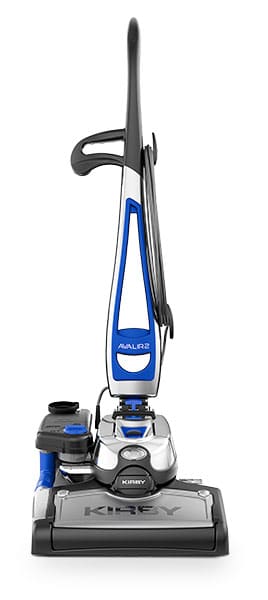
On a Kirby Vacuum How Do I Set the Vacuum on High Gear
Kirby How-To Vacuum Videos
How-To Vacuum Videos

How to alter the belt on your Kirby system:
With the Power Nozzle off, rotate the belt lifter clockwise until the greenish arrows line upwards. Unlock the Rug Plate by unhooking the two latches on the rear of the Power Nozzle. Pull on the rear edge of the Rug Plate to remove.
Slide off the one-time belt and supplant with a new i.
Make sure the numbers on the Brush Ringlet end caps are the aforementioned on both sides before inserting it into the Power Nozzle. Identify the belt and Brush Whorl dorsum into the Power Nozzle. I of the Brush Roll ends is larger than the other. The Brush Curl will only fit in the Power Nozzle one way. Middle the belt on the Brush Roll.
Place the Rug Plate on the front of the Bumper start and then pull it over the rear. Secure it in place with the two latches.
Turn the Belt Lifter counterclockwise until the cherry-red arrows line up. The belt should catch on the claw within the nozzle. Reattach the Power Nozzle to the unit.
Turn the Belt Lifter clockwise until the green arrows line up.
Turn the unit on and check that the Brush Curlicue Indicator Light is on. This means that the brush ringlet is spinning.
How to change Kirby pocketbook:
Get-go make sure your outer bag is unzipped and the top adaptor is pulled out. Have a new dispensable handbag out of the packaging. And so, rest the cardboard faceplate of the disposable filter bag against the bottom of the adaptor. Pivot the faceplate confronting the apartment surface of the adaptor and bend and press the tab at the top of the faceplate until it's secure. The bag back up strap should be connected through the minor hole on the adaptor, which is over the stud. In one case connected, place the whole pocketbook inside the outer bag and close the zipper.
How to install the Power Nozzle:
First you'll want to pull the belt lifter handle on the Power Nozzle, or the head of the vacuum, toward you and turn it counterclockwise until the ruby arrows line up. The hook should grab and stretch the chugalug inside the nozzle.Then, heighten the headlight hood. Reset the 2 hooks on the dorsum of the nozzle on the attaching bar, which is located on the front of the unit of measurement.
Press the nozzle confronting the unit of measurement and secure with the Accessory Lock. Then, pull the belt lifter handle toward you once more and turn information technology clockwise until the greenish arrows line up. (Run into page 22 of the possessor transmission).
How to conform the Power Nozzle height:
To adjust the height of your vacuum, utilize the toe-touch control that is located over the front end wheel. The numbered settings are for carpet and floors.
The dotted settings are for accessories and other cleaning needs. First, plow the unit of measurement on and press the toe-touch upper control pedal as often equally necessary to lower the Power Nozzle to its lowest setting. Press the toe-touch lower command pedal one notch at a fourth dimension to heighten it to your preferred pinnacle. Listen for each click as it raises or lowers.
One click is for deep pile carpeting.
Two clicks are for long fiber carpet.
Three clicks are for pet hair removal.
Four clicks and up are for hose and attachments.
How to install the hose:
Make sure your unit is turned off and is unplugged, and the Power Nozzle is removed (see page 22 of the owner manual). Once removed, wipe down the motor shaft. Then place the hooks off the zipper hose over the attaching bar. Push the hose against the unit and plough the accessory lock clockwise to lock it in place. Lower the headlight hood and plow unit on for use.
How to install the handheld:
Converting your upright vacuum into a portal cleaner gives you the power to conveniently clean your stairs or bed mattresses. Commencement, make sure your unit of measurement is turned off and unplugged. The Tech Drive Power Assist should besides be in neutral. Have off the outer bag by pressing the Bag Release Push button. Then, remove the cord from the handle and button the handle release push at the lesser of the unit of measurement as your pull the the upright handle straight up and out of the slot. Once those are removed, insert the portable handle into the slot where the upright handle was continued. Curve the the outer pocketbook in half and insert the pocketbook latch tab into the slot of the handle with the attachment facing upwards.
How to apply the Tech Bulldoze (Drive Mode):
Tech Drive Power Aid will brand it piece of cake to button and pull the vacuum when in use. First turn the Tech Drive Power Assist on past pressing down on the side of the pedal marked as "D" for bulldoze. This makes it piece of cake to employ while operating the unit.
- Hands move the Kirby arrangement while vacuuming, shampooing carpet or scrubbing difficult floors.
How to use the Tech Bulldoze (Neutral Mode):
Put the Tech Bulldoze in neutral by pressing down on the side of the pedal marked "N". The unit will move easily in neutral when turned off.
- Easily move the Kirby arrangement while not in operation
- Vacuum difficult floors
- Polishing hardwood floors with Phenomenon Smooth High Gloss Floor End
How-To Shampoo Videos
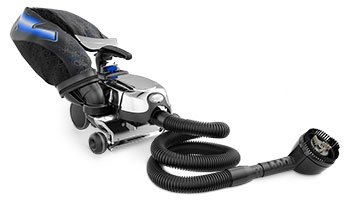
How to install the Multi-Surface Shampoo System:
Use the MSSS for shampooing your carpets and cleaning your difficult surface floors. First, remove the Power Nozzle, and then remove the outer handbag. Lift and remove the waste tray from the MSSS and set aside for now. The carpet brush roll must be used when shampooing carpeting. Insert the baffle strip if necessary with the flat side facing the brush roll. Press the toe-touch command bottom pedal all of the way down to raise the front of the unit. One time that's down, connect the hooks on the rear of the MSSS to the attaching bar. Push the MSSS up against the unit and turn the Accessory Lock clockwise to lock in identify. Plow the nozzle chugalug lifter clockwise until green arrows line up, and lower the headlight hood.
Lastly, insert the waste tray.
How-To Hard Floor Cleaning Videos

Install the Difficult Floor Brush Roll:
When yous are converting your machine to clean hard surface floors, you start demand to remove the power nozzle, or head of the machine, and the outer bag. And then, remove the Waste product Tray from the MSSS. To remove the carpeting brush whorl and insert the Rotary Mop, turn the MSSS nozzle chugalug handle clockwise until the green arrows line up. Turn the nozzle upside downwardly and pull on the belt until it'southward lose and remove the carpet brush roll. Have the belt off the carpet castor roll and place onto the Rotary Mop. Once the belt is on the appropriate brush roll, insert it back into the MSSS. Push up on the belt with your finger and plow the belt lifter handle counterclockwise until the cerise arrows line up. Raise the unit of measurement by pressing all the way down on the toe-touch pedal. Then, connect the hooks on the back of the MSSS to the attaching bar. Push the MSSS upward against the unit, turn the Accessory Lock clockwise, and turn the belt lifter clockwise until the dark-green arrows line up. Lower the hood and put on the waste material tray.
Install the Tile & Grout Brush Roll:
When you are converting your auto to clean tile & grout, yous commencement need to remove the power nozzle, or head of the machine, and the outer purse (see page 22 of the owner manual). Then, remove the Waste Tray from the MSSS. Insert the Tile & Grout Brush Roll. Once the belt is on the appropriate castor roll, insert information technology dorsum into the MSSS. Button up on the belt with your finger and plow the chugalug lifter handle counterclockwise until the red arrows line up. Raise the unit by pressing all the manner down on the toe-touch pedal. Then, connect the hooks on the back of the MSSS to the attaching bar. Push the MSSS up against the unit and turn the Accessory Lock clockwise, and plough the belt lifter clockwise until the green arrows line up. Lower the hood and put on the waste matter tray.
How-To Vacuum Accessories Videos
Convert to Air Pump (Inflater):
To convert your vacuum to a blower, simply attach the hose to the exhaust port. First, remove the power nozzle, or forepart head of the vacuum (meet page 22 of the owner manual). Place the hooks on the back of the air guard over the attaching bar located on the front end of the unit of measurement. Button the air guard confronting the unit and turn the accompaniment lock clockwise to secure it in place. Remove the outer purse by pressing the pocketbook release push button on the elevation of the pocketbook and rotating the bottom base of the bag away from the unit to remove. Then, connect the hose to the air frazzle port. Simply line upwardly the arrow on the finish of the hose with the arrow on the port; twist the hose clockwise until it locks.
Catechumen to Air Pump (Deflater):
To convert your vacuum to a blower, simply adhere the hose to the exhaust port. First, remove the ability nozzle, or front head of the vacuum, (see page 22 of the owner manual). Place the hooks on the back of the air guard over the attaching bar located on the front of the unit. Push button the air guard against the unit and plough the accessory lock clockwise to secure in information technology in identify. Remove the outer handbag by pressing the pocketbook release button on the height of the bag, and rotating the bottom base of the pocketbook away from the unit to remove. Then, connect the hose to the air frazzle port. Just line up the arrow on the end of the hose with the pointer on the port; twist the hose clockwise until it locks.
How to install the portable sprayer:
The portable sprayer tin can just be used in the blower style, and so please visit page 26 of your owner transmission first. Once your unit is gear up in the blower way, it's fourth dimension to ready your sprayer. Unscrew the jar and fill it ¾ full with non-flammable liquid. The dip tube needs to be attached to the sprayer before screwing in the jar. So, adhere the sprayer to the end of the hose. Concur sprayer horizontally and turn the unit on. Squeeze the trigger to spray the solution onto a newspaper to bank check that it works. Plow the command on the trigger to suit the spray pattern.
How to install the portable sprayer:
The portable sprayer can only be used in the blower mode (visit page 26 of your owner transmission). Identify the hooks on the back of the air guard over the attaching bar located on the front end of the unit. Push the air guard confronting the unit of measurement and turn the accompaniment lock clockwise to secure in it in place. Remove the outer purse by pressing the handbag release button on the tiptop of the bag, and rotating the bottom base of the purse away from the unit to remove. And so, connect the hose to the air exhaust port. Just line upwards the arrow on the cease of the hose with the arrow on the port; twist the hose clockwise until it locks.
Once your unit is set up in the blower mode with the hose attached to the front of the unit of measurement, it'southward time to prepare your sprayer. Unscrew the jar and fill it ¾ full with not-combustible liquid. The dip tube needs to be attached to the sprayer before screwing the jar. And then, attach the sprayer to the stop of the hose. Hold sprayer horizontally and turn the unit on. Squeeze the trigger to spray the solution onto a newspaper to check that it works. Turn the command on the trigger to adjust the spray pattern.
How to install the Turbo Accessory:
The Turbo Accessory can be used equally a sander, polisher, or for scrubbing. It is used with the hose on the front of the unit. First, get together the turbo sander and unsnap the sander grit shroud and lift off. Then, rotate the clamp levers up on the side of the turbo accessory, slide a sail of sandpaper into the front clap and lock lever. Tightly wrap the sandpaper around the bottom of the turbo accompaniment and tuck the end into the rear clamp and lock. On a level surface, reattach the sander dust shroud with the opening to the back, and insert the hose. Hold the turbo accessory at the elevation and bottom and turn your Kirby on. Then turn the turbo accessory on.
DOWNLOAD HERE
On a Kirby Vacuum How Do I Set the Vacuum on High Gear UPDATED
Posted by: williamcoles1967.blogspot.com